FNP License Renewal
Subtopics
- FNP License Renewal
- User profile
- Entitlements
- Renewing your licenses
- Downloading licenses
- Viewing license information and reporting
- Managing entitlement and license server aliases
- Downloading the data for license comparison
- License Renewal Comparison Tool
FNP License Renewal
Advantest licenses are purchased on a perpetual basis. However, you must physically renew your FlexNet (FNP) license keys on an annual basis using the web-based Advantest License Renewal Portal. All FNP perpetual licenses expire on 31st March the following year.
Note: FlexNet Embedded licensing (FNE) does not require annual license key renewal. If you want to simplify your license management, consider migrating to FNE licensing. If you choose to migrate from FNP licensing to FNE licensing, existing FNP perpetual licenses are converted to FNE permanent licenses. For more details, contact your Advantest representative.
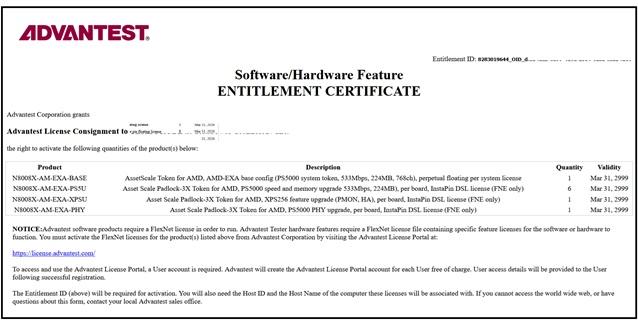
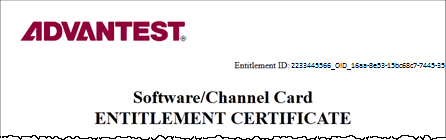
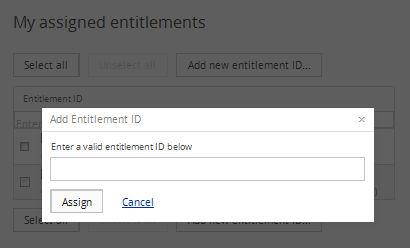
To assign an entitlement and initiate the license renewal process, you need the Entitlement ID, which is stated on your entitlement certificate accompanying each purchase. If you lose or misplace an entitlement certificate, contact your Advantest sales representative for a replacement copy.
User profile
After signing in to the Advantest Licensing Renewal Portal, you can access the User profile page, which displays information about your Advantest License Renewal account.
About this task
You can display the following information about your Advantest License Renewal account:
- User name
- Email address associated with your Advantest License Renewal account
- Roles assigned to you and their associated organizations
Before you begin
Sign in to the Advantest License Renewal Portal.
Procedure
Entitlements
While your company can hold several entitlements, acquired with different purchases, only a subset of those entitlements may be assigned to your user account. To see your assigned entitlements, sign in to your user account at the Advantest Renewal Portal and click the Assign Entitlements link.
An entitlement assigned to you can also be co-assigned to other user accounts, for example, to a general company user account. A hover text (see below) displays the name of all additional user accounts which have that entitlement co-assigned. If an entitlement is assigned to more than one user account, other users can also view and renew the licenses of that entitlement.
Note: If your company has several users managing entitlements, for example, for different sites, you must make a strategic decision on the internal ownership of entitlements.
To avoid later conflicts, the internal ownership for the entitlements must be clear before starting to assign entitlement certificates.
When the ownership changes, due to system movement or other reasons, make sure the change is also reflected in the entitlement assignment on the renewal portal.
The entitlement ID is the key to all assignments and license renewal activities. Entitlement IDs are case sensitive. To assign an entitlement to your user account, you must be able to identify the entitlement that you want to assign, either from the ID or the alias. The first part of the entitlement ID (before _OID_), which is typically the Advantest order number, is usually sufficient to identify and select an entitlement and move it to the "My assigned entitlements" table.
Example
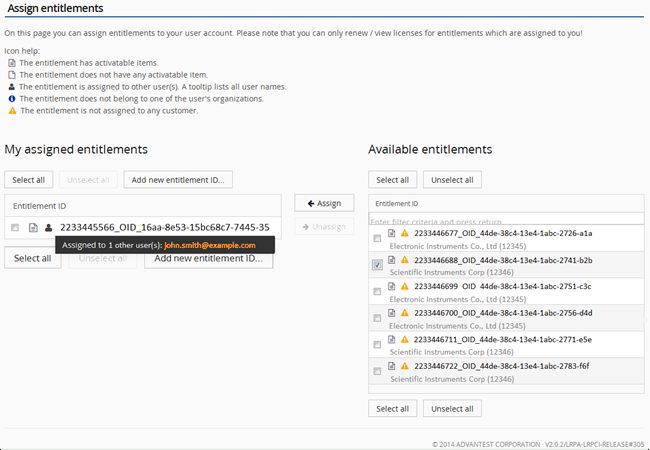
The Assign entitlement page is divided into two lists of entitlements.
-
Displays a list of entitlements that are assigned to you.
-
Available entitlements
-
Displays a list of entitlements that are available but not assigned to you.
The entitlements listed in the table on the right have been purchased by your legal entity.
You can use these lists to:
- Check whether entitlements booked under your legal entity are appropriately assigned to your user account.
- Assign and remove entitlements to and from your user account.
The Assign entitlements page also provides additional information about the entitlements:
 - The entitlement has activatable items.
 - The entitlement does not have any activatable item. These entitlements do not need to be renewed.
 - The entitlement is assigned to other users. A tooltip lists all user names.
 - The entitlement does not belong to any of your assigned organizations (legal entities).
 - The entitlement is not assigned to any customer. Typically all entitlements should be assigned to a customer.
Assigning an entitlement
When an entitlement is assigned to your user account, you get the rights of that entitlement, with all its licenses.
About this task
Note: The main prerequisite for all renewal activities is that you have assigned the appropriate entitlement IDs to your user account.
Entitlements are identified using entitlement IDs. You find the entitlement ID in the upper-right corner of the entitlement certificate that accompanies each purchase.
CAUTION: The entitlement ID is the security key to your licenses. Do not make the entitlement ID public. If other users have the entitlement ID, they can assign it to their account and assume ownership of the license.
To assign an entitlement to your user account, complete the following procedure.
Before you begin
- Make sure that you know which entitlement ID you want to assign to yourself.
- Sign in to the Advantest License Renewal Portal.
Note: Entitlement IDs are case sensitive.
Procedure
- Click Assign.
The list on the left shows those entitlements you assigned to your user account. The list also shows whether an entitlement is assigned to you only, or to others as well. In this case the
 icon is displayed. Hover text displays the names of the other users.
Results
The selected entitlements are now assigned to your user account and appear in the list on the left.
If you have the complete entitlement ID, you can assign an entitlement that belongs to another legal entity, for example, licenses for systems leased from a leasing company, to your user account using the Add new entitlement ID button. This entitlement appears in the Assigned Entitlements list on the left, but not in the list on the right.
Removing an entitlement assignment
When you remove an entitlement assignment, it is no longer assigned to your user account. You will not be able to retrieve or renew the licenses of this entitlement, or view its renewal status.
About this task
You may need to do this if somebody else has since been assigned as the entitlement owner, for example, when a system is moved to another site.
To unassign an entitlement from your user account, complete the following procedure.
Before you begin
Before you remove an entitlement ID, make sure you do not need to access the entitlement in the future.
Procedure
Results
The specified entitlements are no longer assigned to your user account and removed from the list on the left.
Renewing your licenses
Renewing your licenses enables to keep using them.
About this task
A license is based on several parameters:
- Current Host IDs
- Entitlement ID
- Product ID
- Product Description
- Total Quantity
- Previous Year's Activations
- Remaining Quantity
- Expiration Date
You can check these settings and adjust Host IDs and the amount of licenses per host to your current environment.
When renewing your current licenses, you have two options:
-
Simple (one-click) renewal
If there are no changes compared to the previous year's license requirements, you can renew the existing FNP licenses for a license server using Simple Renewal.
-
Advanced renewal
If you need a different combination of licenses, you can select and specify the servers and the quantities of FNP licenses using Advanced Renewal and entering the required license counts in the table. The table lists:
- Total and remaining license count across all servers
- Last year's license count (this server) - Existing license count for the associated server.
- Already renewed this year (this server) - Renewed license count for associated server.
- Renewed other host - License count migrated to an alternative server and renewed.
Before you begin
Before you can review and change your current license data, sign in to the Renewal Portal and make sure that you have entitlement IDs assigned to your user account.
Procedures
Simple renewal
- In the Advantest Renewal Portal start page, select the Renew licenses tab.
The Renew licenses - server overview page opens.
- For the server that you want to renew, click Renew licenses.
The Renew licenses - assign to server page opens.
- Click Simple Renewal.
Note: The Simple Renewal button is deactivated if there have been any renewals on the selected license servers.
The License Renewal Summary window is displayed for the selected license server, listing the entitlement IDs, associated product descriptions, the existing license counts and the number of licenses to be renewed.
Note This is the last chance to cancel the action. Ensure that the license renewal summary is correct before using the Generate button.
- To create the new licenses, click Generate.
- If the data entered is correct, click Continue.
- After you have renewed all your licenses on a particular license server, download these licenses and install them on your license servers.
Advanced renewal
- In the Advantest Renewal Portal start page, select the Renew licenses tab.
The Renew licenses - server overview page opens.
- For the server that you want to renew, click Renew licenses.
The Renew licenses - assign to server(s) page opens displaying the existing license information for all entitlements that are hosted on the selected license server.
There are two main actions that you may execute:
- Specify an additional or alternative license server to manage the renewed licenses.
- Specify the number of licenses to be assigned for each license and each license server, if you have the license management split over more than one server.
- To get an overview of the entitlements, the licenses servers that manage them and the license details, click Advanced Renewal.
Note: The Advanced Renewal button expands the table showing the licenses.
- Optional:
You can change the view of the table to show either the product names or the entitlement IDs by toggling the link:
Change to Entitlement ID View / Change to Product View
To sort any table column alphabetically or numerically, click the header of the column.
To find a particular product or entitlement ID, enter a string corresponding to the required entitlement ID or product in any of the filter fields below the column headers and press Enter. The list of products or entitlement IDs is filtered to display only those items that include the specified filter string.
- For each entitlement that needs licenses to be renewed, assign the license count for each associated server. Change the managing license server, if required.
If you want to split the license count across more than one license server, complete the following additional steps:
- Select a server that is to manage one or more new licenses and enter the required license count for that server.
If the entered license count is less than the total required, the Split Line button is activated. The Split Line button and other functions are active when you leave the number field (click in another field or outside of the field).
If the number in the count field exceeds the maximum license count, the number box is highlighted in red. You can display an error message tooltip for any assignment errors.
If you want quickly specify the same values as used last year and/or move the licenses to another license server, use the Assign Server and License Count up to Last Years Count button. This is helpful if most values are to remain the same and you want to edit only a few license counts. This function can only be used before specifying any changes.
To select an additional server, click Split Line.From the new menu, select an additional server and enter the required license count for that server.
- If you want to add a new license server, select Enter new server.
The Add new license server window opens. Enter the name of the new server and specify the server type.
Click Apply.
- Enter the required license count for the new license server. If you want to remove any pending changes, click Reset.
Note: Any newly-added server is stored if you associate a license with it. If you do not use it and leave the page, the new server is not saved and must be added again if required.
- Select a server that is to manage one or more new licenses and enter the required license count for that server.
- To generate a license renewal summary, click Generate License ....
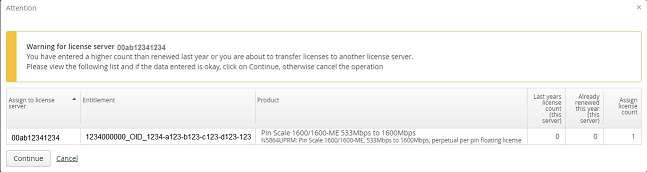
Note: If you enter a different license server or a higher count as last year, a warning summary window is displayed.

If the information entered is correct, click Continue to generate a license renewal summary. - Click Generate License to create the new licenses.
Note: This is the last chance to cancel the action. Please ensure that the license renewal summary is correct before using the Generate License button.
After you have renewed all your licenses on a particular license server, download these licenses and install them on to your license server.
Non-activated licenses
Non-activated licenses are:
- New licenses that have not been activated
- Existing licenses that were not renewed last year
If non-activated licenses are available, the Renew license - server overview page displays the entry Non-activated items at the bottom of the list:
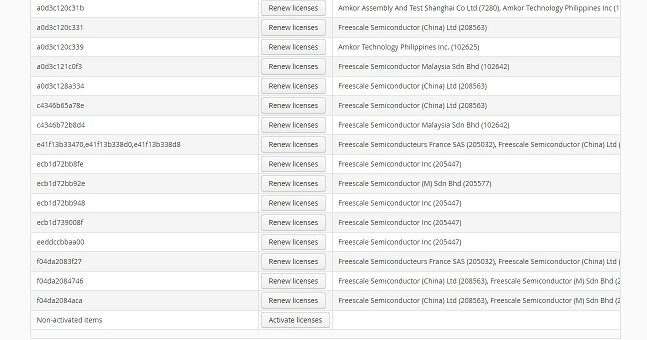
To open the page displaying the non-activated licenses, from which you can activate or renew the licenses, click the Activate licenses button.
After you have activated or renewed a license to a license server, you can view these licenses in the Renew license - server overview page by selecting the associated license server.
Note: To split a non-activated license, first select the license server and then enter the count.
Results
All selected licenses are renewed and can be installed on the license server after you have downloaded them.
What to do next
Proceed with Downloading licenses
Downloading licenses
You must download the licenses that you have renewed and install them on your license server.
About this task
You can download the licenses that you have renewed in one of two ways:
- Download directly to your computer
- Email to your registered business email account
To download available license files, complete the following procedure.
Before you begin
You must have already renewed licenses and generated the associated license files for download.
Procedure
Results
The selected licenses are received in a ZIP file. The licenses within the ZIP file are sorted alphabetically by organization and license name.
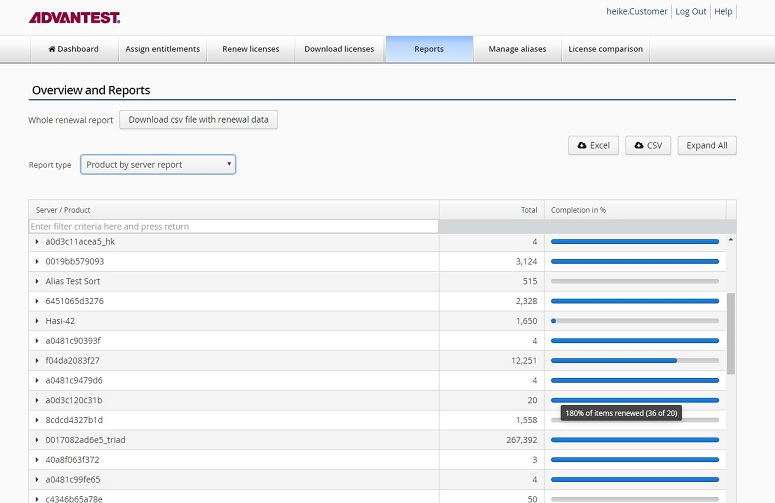
Viewing license information and reporting
The Overview and Reports page helps you to get an overview about the status of your product licenses and entitlements that are assigned to your user account. The following preconfigured reports are included:
- Entitlement by organization report
- Product by organization report
- Product by server report
- Splitted entitlements overview
You can also use the export tools available from the Overview and Reports page to create simple reports in Microsoft Excel or CSV formats.
Even outside of the renewal period, the Reports page gives you an overview about your licenses (only perpetual, renewable licenses).
Creating a report
You can run any of the preconfigured reports to get information about the status of your licenses.
About this task
You will run one of the available preconfigured reports:
- Entitlement by organization report
- Product by organization report
- Product by server report
- Splitted entitlements overview
To create a report about your licenses and entitlements, complete the following procedure.
Procedure
- In the Advantest Renewal Portal start page, select the Reports tab.
The Overviews and Reports page opens.
Results
The selected report shows you the renewal completion status for the entitlement IDs assigned to your user account.
What to do next
You can export the report results to a file in Microsoft Excel or CSV format.
Exporting a report
You can export the results of the preconfigured license reports. The reports show you the renewal completion results related to the entitlement IDs assigned to your user account.
About this task
You export the displayed report results to a file in Microsoft Excel or CSV format.
To export the displayed report, complete the following procedure.
Before you begin
Make sure that the report results that you want to export are displayed.
Procedure
- In the Reports tab of the Advantest Renewal Portal, make sure that the report results that you want to export are displayed.
- To select the format of the report file to be exported, click Excel or CSV.
- Download and save the report file to your computer.
Results
The selected report results are saved to a file in the selected format and downloaded to your computer or storage location.
Related information
Managing entitlement and license server aliases
Entitlements and servers can be assigned aliases (alternative, easily-recognizable names).
About this task
Assign an alias for an entitlement or a server and add associated information, such as contact data.
To assign an alias to an entitlement ID or a server ID, complete the following procedure.
Before you begin
You must first identify the server or entitlement to which you want to apply an alias.
Procedure
Results
The selected entitlements and servers are now identified by their aliases. The alias name is used on the other Renewal Portal pages as the primary name. The original value is either listed beneath the alias or displayed in a tooltip. The contact info and location field are not displayed on other Renewal Portal pages and is only available for you and your Advantest representative.
Downloading the data for license comparison
The License Renewal Comparison Tool supports you in the annual license renewal process by providing you with two summary CSV files (Renewed.csv and To-Be-Renewed.csv) that list the already renewed licenses and the still-to-be-renewed licenses. The two files helps you maintain and overview of the current status of the Advantest License Renewal Portal's records.
About this task
To download the two summary CSV files for the license comparison tool, complete the following procedure.
Procedure
Results
You have downloaded the Renewal Portal data files you need to load in the license comparison tool:
Renewed.csvTo-Be-Renewed.csv
License Renewal Comparison Tool
Subtopics
- Installing and updating the Comparison Tool
- Executing a comparison
- Managing files to compare
- How to proceed in case of discrepancies
- getOrderNumbers tool
The License Renewal Comparison Tool supports you in the annual license renewal process.
The tool allows you to compare the license inventory of your license servers with the License Renewal Portal's download records. These portal downloads (Renewed....csv and To-Be-Renewed....csv) show which licenses were already renewed, and which licenses still need to be renewed.
You must have visited the License Renewal Portal and your license servers before running the License Renewal Comparison Tool, so that those inputs to the tool are already available.
The License Renewal Comparison Tool displays the download records, the license inventory of your license servers, and any mismatching in a tabular format. Having all this information in one place will make any licensing discrepancies visible.
Installing and updating the Comparison Tool
The License Renewal Comparison Tool is written in Java and can be run on a PC running Microsoft (MS) Windows, or on a Red Hat Enterprise Linux (RHEL) workstation, including a V93000 system controller or an RHEL workstation serving as a FLEXlm license server.
About this task
Note: Every year, starting 2017, Advantest will provide an updated license product list. You must install this list before using the License comparison Tool.
The installation and start procedures differ between Microsoft (MS) Windows and Red Hat Enterprise Linux (RHEL). Once installed, you can run the Comparison Tool in on-line or in off-line mode in either environment.
Before you begin
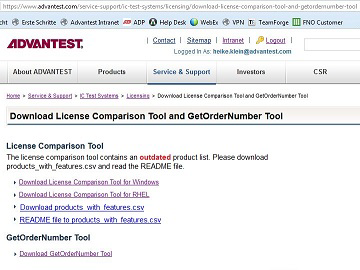
Download the installation files for the Comparison Tool from the Advantest web page as follows:
Go to: www.advantest.com/licensing and go to Download License Comparison Tool and GetOrderNumbers Tool.
Download the installation package appropriate for your computer operating system. The available packages are:
MS_Windows_Installation_Package_64bitMS_Windows_Installation_Package_32bitLinux_Installation_Package_for_RHEL5
Note: Also download the getOrderNumbers tool appropriate for your system controller operating system. You will need this file later. The available tools are:
GetOrderNumbers_Tool_0.91_for_RHEL5GetOrderNumbers_Tool_0.91_for_RHEL7Products_with_features.csv
Note: Check the date on the webpage to make sure that you have the latest version of the Products_with_features.csv file.
You can download the installation files for the Comparison Tool from the Advantest web page or via the start page of the License Renewal Portal.
- To download the tool from the Advantest web page sign on to the Advantest Software Center and go to: .
- Download the appropriate tool for your operating system and the
products_with_features.csvfile.
Procedures
MS Windows installation and start:
- Execute the RenewalComparison.exe file. The installation wizard appears.
- To complete the installation follow the instructions.
- Save the new
Products_with_features.csvfile to the following location:
64 bit:
c:\Program Files(x86)\Advantest\Renewal32 bit:
c:\Program Files\Advantest\Renewal - To start the Comparison Tool on a PC click
The welcome window with further information appears (see below).
RHEL installation and start:
To install the Comparison Tool on RHEL you must have superuser rights.
- Open a Terminal Window and switch user (su) to superuser (root).
- Change to the directory where you saved the
RenewalComparison*.binfile. - To execute the installation package type
./RenewalComparison_el5_x86_64.binThis unpacks the installation wizard and launches it.
- To complete the installation follow the instructions.
- Save the new
Products_with_features.csvfile to the following location:/opt/93000.Renewal/bin - To close the installation wizard click Done.
- Exit the superuser mode.
- To start the Comparison Tool type
/opt/93000_Renewal/bin/startComparisonTool
Results
The Comparison Tool starts with the welcome window which provides further information.

What to do next
If you have the files required for a comparison click OK. If not, click Cancel and restart the Comparison Tool once you have the required input files.
Executing a comparison
The License Renewal Comparison Tool helps you to make any licensing discrepancies visible by comparing the license status of your license servers against the status of the Advantest License Renewal Portal.
About this task
The tool prompts you to load several input files and automatically compares them against each other and a list of Advantest products and features. You can run the tool on a Linux workstation or on a PC running Microsoft Windows.
Before you begin
Before starting the Comparison Tool, you must have downloaded the required portal files from the License Renewal Portal. In addition, you must have run the getOrderNumbers tool on your license servers.
Note: Check the date on the webpage to make sure that you have the latest version of the Products_with_features.csv file.
Before you start a comparison you must have the following files ready:
- Portal download file of already renewed licenses (
Renewed-*-date.csv) - License server inventory file or files (*.txt) generated by the getOrderNumbers tool.
The following file is optional:
- Portal download file of still to be renewed licenses (
To-Be-Renewed-*-date.csv)
If you Do not have the required input files you cannot complete the comparison.
Advantest recommends to collect all these files in a single directory. This will ease the task. For details see Managing files to compare.
Procedure
Results
The Comparison Tool's processes and compares all these files against the data displayed in the Product Number Key tab (see below). The process may take a few seconds. When done, the tool displays the result in up to seven tabs. Per default the Matched tab shows up in the foreground.
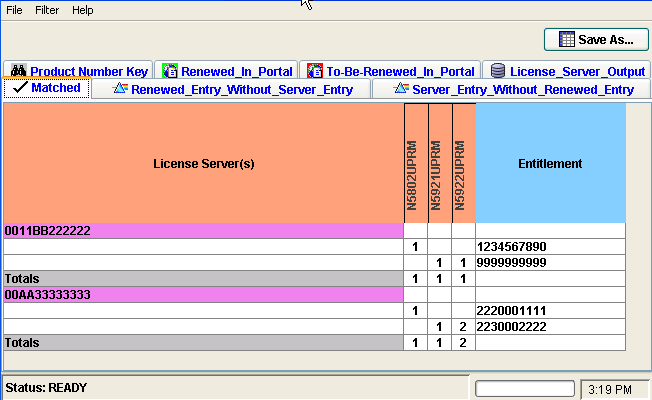
The tabs of the tool contain the following data:
-
Product Number Key:
Maps Product IDs, Product Descriptions, and the relevant Licensing Model. This data is required to map the features of the license inventory files with the product numbers in the portal download files.
-
Renewed_In_Portal:
Lists all licenses that were already renewed and also shows if there is any remaining data.
-
To_Be_Renewed_In_Portal:
Lists all licenses which still need to be renewed. Advantest recommends to use this download data from the License Renewal Portal as it provides insight, in case the renewal process does not run as smooth as expected.
-
License_Server_Output:
Lists all licenses found by the getOrderNumbers tool on the license servers.
-
Matched:
Lists those entitlements that were renewed and could be located on the license servers. These entitlements require no further effort.
-
Renewed_Entry_Without_Server_Entry:
Lists any entitlements that were renewed but have no matching entry in the License Server inventory data. These could have been rehosted or never installed on the license servers. Any entry here represents a discrepancy and requires further investigation.
-
Server_Entry_Without_Renewed_Entry:
Lists any entitlements found in the License Server inventory data, but not found in the License Renewal Portal. Again, any entry here represents a discrepancy and requires further investigation.
What to do next
You can save the data of any tab in a spreadsheet format. To save a tab move it to the foreground and click Save As.... See also How to save resulting files.
If there are any discrepancies, that is, any entries in the Renewed_Entry_Without_Server_Entry or Server_Entry_Without_Renewed_Entry tabs, please proceed as outlined in How to proceed in case of discrepancies.
Managing files to compare
The License Renewal Comparison Tool requires the following input files:
- One or more license server inventory file or files (
*.txt) generated by the getOrderNumbers tool. - Portal download file of already renewed licenses (
Renewed-*-date.csv)
Optionally, you can load the portal download file of still to be renewed licenses (To-Be-Renewed-*-date.csv).
The comparison tool processes these files against the data in the Product Number Key tab. This data is provided with the yearly updated version of the tool (see How to install and start the Comparison Tool).
License server inventory .txt files
In most cases you will have a single license server inventory file (getOrderNumbers output file).
This is the case if your licensing setup consists of a single FLEXlm license server, if it is a three-license-server redundancy configuration, or for multiple independent license servers in a network. For these configurations you will have one license server inventory file showing the installed licenses for all license servers.
Only in case of multiple license servers in independent networks you will have one license server inventory file per network. In this case you must run the getOrderNumbers tool on a server in each network.
You must use a .txt file name extension for each file, for example license-inventory-server01.txt.
Renewed-*-date.csv files
You must visit the License Renewal Portal before running the Comparison Tool. The portal allows you to download a record file which lists the already renewed licenses (Renewed-*-date.csv).
To-Be-Renewed-*-date.csv files
The License Renewal Portal also allows you to download record file of still to be renewed licenses (To-Be-Renewed-*-date.csv). This file as it provides insight, in case the renewal process does not run as smooth as expected.
Collect in single directory
The License Renewal Portal writes both .csv record files into a License.zip file. For further processing you need to extract them.
Advantest recommends to create a single directory or folder, for example verigy-license-renewal-year, and collect all these files in this directory. If all input files are available in your local file system, you can run the Comparison Tool stand-alone in off-line mode.
The directory of your collected input files may look as follows:verigy-license-renewal-2009/license-inventory-server01.txtverigy-license-renewal-2009/Renewed-*-date.csvverigy-license-renewal-2009/To-Be-Renewed-*-date.csv
How to proceed in case of discrepancies
The Advantest License Renewal Comparison Tool helps you to compare the license status of your license servers against the status of Advantest's license database (reflected in the Advantest License Renewal Portal).
About this task
Solving these discrepancies may be a tedious task. The recommendations below can only be on a general level, as every situation will be different.
Any discrepancies will be listed in the Renewed_Entry_Without_Server_Entry or Server_Entry_Without_Renewed_Entry tabs of the Comparison Tool.
The recommended procedures differ depending on where the unmatched license was found.
Before you begin
Make sure your input files are up-to-date and reflect the current status.
Make sure you have all input files, especially in case of multiple license inventory files.
Procedures
Renewed_Entry_Without_Server_Entry tab:
An entry in this tab means, an entitlement was renewed in the license database, but was not found on any of your license servers. The reason could be one of the following:
- You may have missed out one license server when running the getOrderNumbers tool.
- Solution: Run the getOrderNumbers tool on that license server host.
- Solution: Run the getOrderNumbers tool on that license server host.
- You may have forgotten to load one or more of the generated license inventory files.
- Solution: Load the files.
- Solution: Load the files.
- You may have activated a license but never installed it on your license servers.
- Solution: Install the license and rerun the getOrderNumbers tool.
- Solution: Install the license and rerun the getOrderNumbers tool.
- You may have transferred a license to another legal entity or to another user, but that transfer was not yet reflected in the entitlement assignment in the License Renewal Portal.
- Solution: Update the license database and assign the correct owner.
If none of the above applies, please contact your Advantest representative.
Server_Entry_Without_Renewed_Entry tab:
An entry in this tab means, a license was found on one of your license servers, but was not renewed in the license database. The reason could be one of the following:
- You may have forgotten to assign the entitlement to the user of the License Renewal Portal.
- Solution: Assign the entitlement.
- Solution: Assign the entitlement.
- You may have purchased a new product, and its license needs to be renewed for the first time.
- Solution: The newly purchased licenses will show up in the To_Be_Renewed data once the Renewal round starts. Please check the download records of To_Be_Renewed licenses.
- Solution: The newly purchased licenses will show up in the To_Be_Renewed data once the Renewal round starts. Please check the download records of To_Be_Renewed licenses.
- You may have transferred or rehosted a license to another user, server, or to another legal entity, but that transfer or rehosting was not yet completed on the license server.
- Solution: Remove the license from your server.
- Solution: Remove the license from your server.
- You may have received a license from another user or legal entity, but that transfer is not yet reflected in the License Renewal Portal.
- Solution: Update the Entitlement Assignment in the License Renewal Portal.
If none of the above applies, please contact your Advantest representative.
What to do next
Once the discrepancy is solved, make sure both your license servers and the license database are up-to-date.
getOrderNumbers tool
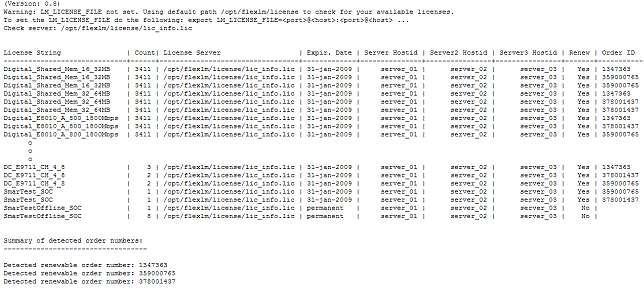
The getOrderNumbers tool provides you with a complete list of the licenses installed on your license servers. This output is one of the files required by the License Renewal Comparison Tool and helps you with the annual license renewal process.
CAUTION: Do not run the getOrderNumbers tool under user root. This can lead to longer execution times.
Note: Prerequisite: FLEXlm license server software version: ≥ 11.9.1.1.
Note: The getOrderNumbers tool is available for Red Hat Enterprise Linux 5 and 7. Use the version applicable to your operating system version.
getOrderNumbers tool either on one of your license server hosts or on any of the SmarTest clients.
-
Sign on to the Advantest Software Center and go to:
-
To install the tool, extract it and copy it to a host in your network, for example at
/home/my_name/license-renewal-tools/getOrderNumbers.Once you copied the file, make sure it is executable.
-
For the recommended three-license-server redundancy configuration or for multiple license servers within a network, you need to run the
getOrderNumberstool only once, either on one of the license server hosts or on a SmarTest client host.If you have license servers in multiple independent networks, you must run the
getOrderNumberstool in each network.
Example
For example, for a three-license-server redundancy configuration, the output is one license server inventory file showing the installed licenses for all three servers: